
With the work-from-home extending longer than many of us anticipated, not to mention the countless companies that are allowing remote work to become a permanent option, now is a great time to take a look at some common (and easy) steps to secure your home network.
Following these steps will keep you out of the “low-hanging fruit” category for attackers, not only for work, but for your personal activities and devices as well. It’s easy to understand why you wouldn’t want to unwittingly expose your work data to attackers (no-one wants that call from HR), but most people don’t notice how interwoven personal and professional data is. A successful attack on your personal accounts and devices often results in a successful attack on the professional side as well.
It is important to follow these steps on your computer after you have connected to your home network, be it by ethernet cable or wifi. Here we go!
Logging into your Default Gateway/Router:
- Click your search bar (located on your taskbar) OR click on your Windows Start Menu icon (normally in the lower left corner of your screen)
- Type: CMD > Hit Enter. A new window pop-up that displays cryptic text.
- Type: ipconfig > Hit Enter. You will get something like this:
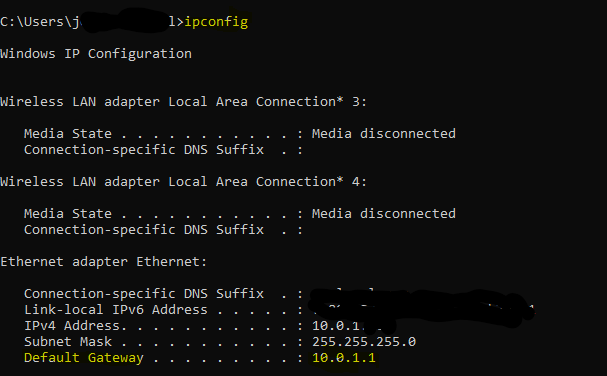 Depending on how you are connected to your home network (wifi vs ethernet), that box will have a few sections of text. What we are looking for is the Default Gateway address, which will have a string of numbers associated with it (i.e., 192.168.1.1). This is the IP address of your router’s gateway; basically the front door of your home network. Take note of it; we’ll use it shortly.
 - This next step involves sleuthing. Find your physical router (what Comcast gave you) and look for the manufacturer and model. It should be clearly marked, and you may have a sticker on it with passwords and your network WiFi Take a picture of this to spare yourself of having to go back repeatedly. Some common models are Arris, Motorola and Netgear. Once you have that, do a quick Google search for “default username and password for (enter your router manufacturer and model here)”. This will result in the default credentials for logging in. Your service provider may have changed them, in which case you can try the username and password be on that sticker you took a picture of. See? Handy!
- Open a web browser and type the IP address we took note of in step 2. Mine would be 10.0.1.1. This should take you to a login page. Try the username and password on the sticker of your router/modem first. If not, try the default username and password you found in your google search. Chances are pretty good that one of those will work.
- After you successfully log in, you will have some options and menu tabs. What you see is different based on your equipment, but they should all have a few things in common. Don’t’ be scared to click around! Every tab and menu has options, and you will need to do some clicking to get there.
Secure Your Stuff:
- Change those login credentials! This is particularly important if you logged in using those default credentials you found in a Google search. We don’t want anyone to be able to walk by your house and gain access to your home network. Change it to something you will remember. You may find this in a System Settings menu, and click Change/Modify should bring you to something that looks like this:
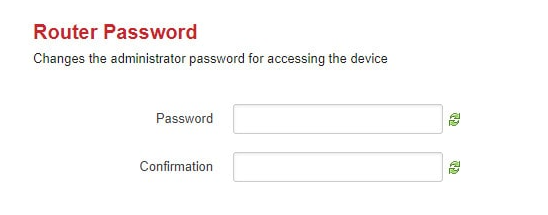 Using a long passphrase is best (as opposed to random combinations). You will likely remember it better and it will be much more difficult to crack. Think more like “ThisIsReallyAnnoying2020!” and less like “Teddy123”. Click the Save/Apply button. You will need to log back in to continue.
 - Update your router’s firmware! This is the MOST overlooked aspect of securing your home network, and one that often presents one of the greatest security risks. Router firmware usually doesn’t have an auto-update mechanism, and you typically don’t get a notification that an update is available. This leaves you vulnerable to all the security vulnerabilities that may have cropped up since it entered your home. This setting should be in the System Settings menu and, depending on your router/modem and its age, there may or may not be an update. Click on the Check for Firmware Update button (or similarly-worded button) and let it do its thing. The router may reboot afterwards, at which point you’ll need to login again. I hope you remember that passphrase you made!
- Now, let’s get complicated. You can turn off Plug and Play. This setting could be in a manner of places. Try the WiFi menu, the Security menu, or the System Settings menu. It may go by the title UPnP, and this allows for your router to auto-discover devices. This is useful for “Internet of Things” devices like Alexa and Google Home, but leaving it on 24/7 leaves you open to devices that you may not want to interact with your network. Turn it off. You can always turn it back on if needed!
- Turn Off WPS: This setting will most commonly be found in the WiFi or Network menu. The process by which it operates has been proven to be a huge security vulnerability and should be disabled. You have probably never used it anyway, relying on manually entering your WiFi password to join the network. Let’s shrink your attack surface and turn it off.
Give yourself a pat on the back! You’ve just performed what may seem like a tedious task, but you’ve also made yourself a lot more difficult to attack. The key about security isn’t to be perfect; the key is to make yourself harder to attack than the next guy. Think of it like being chased by a bear: you don’t have to outrun the bear, you just have to outrun the person next to you. Attackers generally look for the path of least resistance, and you just made yourself a little less appealing!