
With the workforce still largely at home, it has been open season for advertisers and marketing agencies to steal obtain your private data. And if you think Google, Apple, and Facebook are the only folks you should be looking out for, think again.
Your very own ISP (Internet Service Provider) plays a vital role in harvesting your data to be bundled up and sold off to these companies. Now that you’ve been working from home for nearly a year, you may have noticed those ads targeting you with a scary level of precision. Why is that? Your internet browsing hasn’t increased that much, has it?
Look no further than the folks at Comcast, AT&T, and other ISPs. Ya know, the folks that let you pay astronomical fees for the privilege of internet access. On its own, that router that you use (and also pay for) is set to forward ALL DNS requests right to them. For those unfamiliar, DNS stands for Doman Name Service, and that is what translates IP addresses like 69.252.80.75 into comcast.com, or whatever else you type into a web browser.
When you type in a domain name like “comcast.com” into your browser and hit enter, that human friendly website name (called a domain name) must be translated into a server IP address (69.252.80.75); that is the address of the server that hosts Comcast’s “website” and delivers you the data therein. That process of “translating”? That’s DNS. When it goes down, so does the internet.
By routing all your DNS requests straight to themselves, ISP’s can log, monitor, and capture all your internet activity. Sounds scary, doesn’t it? Your ISP sees and most certainly logs ALL of your DNS requests.
So how do we make them cry, you ask? Well, you can use a VPN, but who wants to deal with slowdowns or fiddle with settings and kill-switches and such? And even that doesn’t always re-route your DNS queries. A far simpler solution (depending on how hard core you want to get) would be to route your DNS elsewhere. It’s far simpler than it sounds.
Step 1 is to find your own DNS provider. There are a lot of them out there, and I personally use Nextdns due to the features (built-in ad and tracker blocking just to name 2 of many). Some are free, some have paid plans. I went with the paid plan ($1.99/month) to get more features, but do a little bit of googling and choose one that works best for you.
Have a DNS provider? Great! Move onto Step2: You should have a “setup” or “configure” menu somewhere on your new DNS provider’s site, where you can select the DNS server address you need to point your router to. Remember this post? We’ll use the same process of accessing your router (hopefully you changed the default password. I recently showed a user how scary easy it was to access his home router/devices from my house) but instead of diving into security menus, we’ll be looking at DNS.
This DNS setting that we’re talking about can usually be found in a menu with “gateway”, “Local IP network”, “IP4”, or “DNS”. You’ll know you’ve reached the right page when you see something like this:
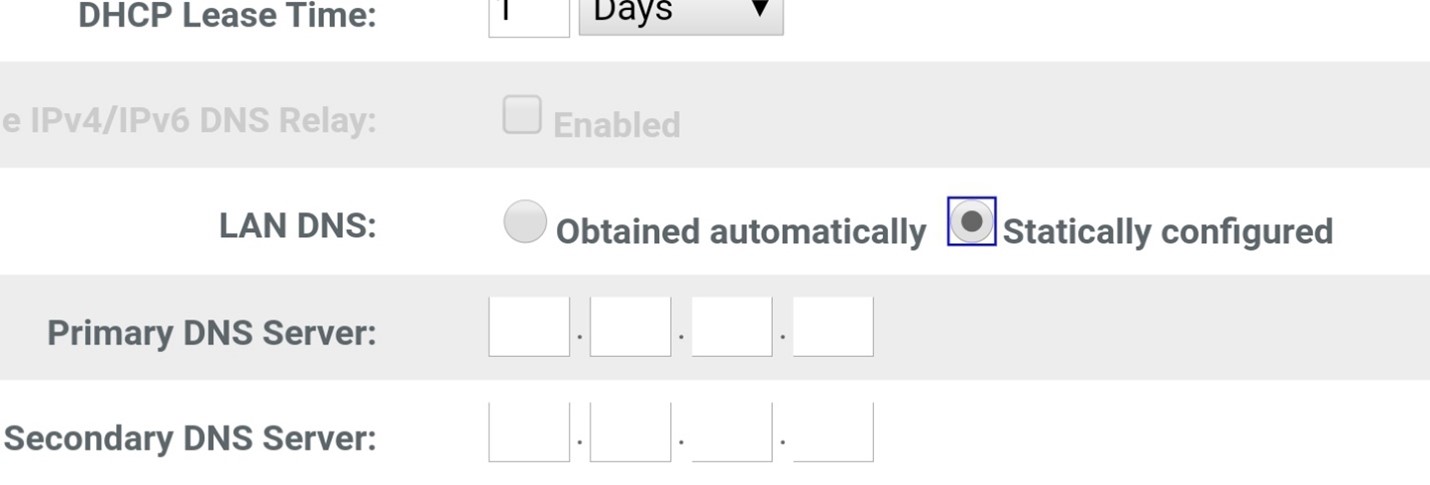
The DNS settings you see will very more than likely have that “Obtained Automatically” button checked, and the fields with “Primary DNS Server” and “Secondary DNS Server” will be auto-filled, or even appear blank. Change that to “Statically Configured” (your option may be worded differently) and enter the DNS address provided to you by the provider you chose. Save your settings, let your router reboot, and rejoice! Somewhere, your ISP is shaking their fist at the fact that they can no longer passively watch all of the network traffic at your home.
This will have the benefit of not only keeping your ISP out of your business (to an extent) and allow for built-in ad and tracker blocking (if your provider has that feature), but may very well speed up your internet speeds. Win-win.